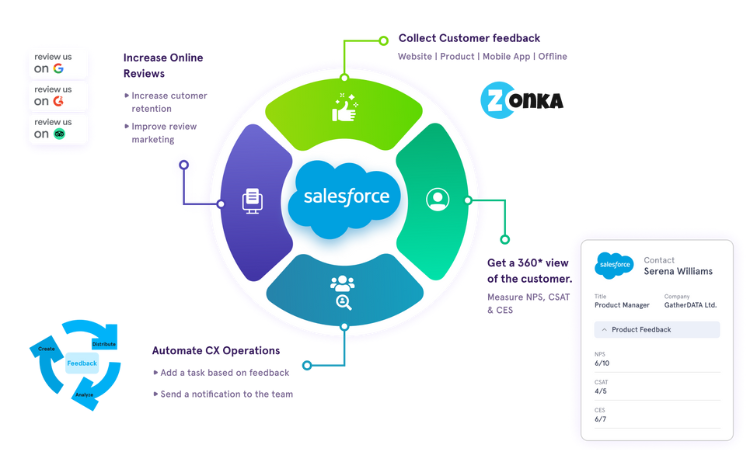
The best utilization of your customer data in an effective CRM like Salesforce is to collate it with customer feedback data received through feedback survey responses. The effectiveness of the integration of your survey software with Salesforce lies in the mapping of survey response data with the contacts in Salesforce. This means manual or automated synchronization of records and centralization of customer data so your CX team can use it efficiently without the whole back and forth.

Salesforce Response Mapping is the core of this whole integration process. If you want to utilize the maximum benefits of this integration and conduct effective Salesforce Feedback Management, it is vital to ensure that your mapping for Salesforce surveys is up to the mark. For this, you first need to understand the types of Survey Mapping you can do to integrate your CRM like salesforce with the survey tool.
Measure CX at all touchpoints with Salesforce Surveys
Send surveys and get a 360° view of customers your customers right within Salesforce with Zonka Feedback

In this article, we explore and help you understand how you can map survey responses received through Salesforce surveys to the customer data in Salesforce with the two types of Salesforce Survey Mapping in Zonka Feedback.
Types of Salesforce Survey Mapping
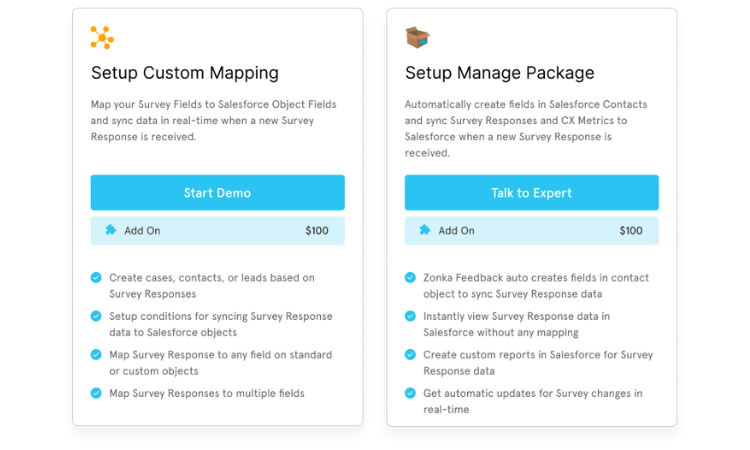
There are two types of Salesforce Survey Mapping that you can do to integrate Zonka Feedback with Salesforce:
- Custom Mapping
- Managed Mapping
Custom Mapping is mapping all your salesforce fields with the salesforce object attributes manually, whereas Managed Mapping is the automatic mapping of survey and response fields with the salesforce contact objects. Let’s learn more about both of them and understand how to map survey responses to Salesforce through these mapping techniques.

1. Custom Mapping
In Custom Mapping, you need to manually do salesforce field mapping of all survey response fields to the attributes of the salesforce objects. As soon as a survey response is received, it will be synced to the salesforce lead capture data in real time. This will give your teams a holistic view of all the customer data, including feedback responses in one place, i.e., in specific customer accounts or records. Here are the steps to do Customer Mapping.
Steps to Custom Salesforce Survey Mapping
Here are the steps you must follow to enable customer survey mapping:
- Go to Survey List view and choose a survey template according to your business requirement.
- Go to the Integrations tab in the top navigation, and choose Connect to Salesforce.
- You will get to see the salesforce Detail Page appearing on your screen. Here, you get the option to choose between Custom and Managed Mapping. Select Custom Mapping here.
- Now, the salesforce Authorization page will appear on your screen. Simultaneously, you will receive an OTP on your email ID. Use this OTP to authenticate and gain access to your salesforce account.
- When the authentication is successful, you will be redirected to the Zonka Feedback platform, where you get the option to Add Mapping.
Once you click the 'Add Mapping' option, you will see a slide appearing on your screen with these fields:
- Mapping Name - In this field, you can create a textual identifier for your mapping.
- Salesforce Object Type - It is a list of all salesforce objects. From this list, you can select the objects to which you want to sync the survey response data.
- Select an Action - You will get a dropdown list containing all the options of actions available for the particular object you have chosen.
- Select a Mapping Condition - In this field, you can specify when you want this mapping to trigger. You can add mapping conditions here to select some particular kind of responses, and can also choose to trigger for all conditions. Choose among the following options:
- Every Time: For triggering all responses
- Only When: For triggering, only when the specified conditions are fulfilled
- What do you want to Map - Now, you get the choice to map the Zonka Feedback Survey fields to salesforce Objects Fields. Here, you also get the option to select ‘No Mapping’ in case you do not want to map at the moment.
- Enable Mapping - Now, you can finally enable Mapping by selecting the ‘Save’ option. Ensure that you have mapped all the necessary fields before clicking on Save.
2. Managed Mapping
In Managed Mapping, you don’t need to map all the Salesforce Objects manually. It is a convenient alternative in which you get an easy-to-install package that automatically syncs survey response fields to Salesforce Contacts.
To enable Managed Mapping, you need to have Zonka Feedback Salesforce Package, which means you need to subscribe to our Growth Plan or higher.
Steps to Managed Salesforce Survey Mapping
Install the Zonka Feedback Salesforce Package by following these steps:
- As per your business requirement, select a survey from the Survey List View.
- Go to the Integrations tab from the top navigation, and connect to Salesforce.
- The Survey Authorization page will appear, and you will get an OTP to authorize on your email account. Enter the OTP and gain access to your Salesforce account.
- After successful authentication, you will be redirected to the Package Installation Page. Now you need to install the Salesforce Package (Growth or higher plan) for running the Manage Mapping and proceeding to the next step.
After this, configure the Page Layout and add the related lists of the Contact Objects. Here are the things you will need to do next:
- On the top right corner of the Salesforce Home page, go to Settings.
- A dropdown will appear from which you need to choose Setup Settings.
- In the screen navigation, proceed to ‘Object Manager.'
- A list of Salesforce objects will appear. Now, you need to select the Contact object from this list.
- Click on Page Layouts in the left panel of the Contact Object Manager.
- Under Page Layout, choose Contact Layout.
- You will see all the object components in the left panel. Here you need to select the ‘Related Lists’.
- Drag and Drop the Respons list on your Page Layout and proceed further.
Now, you can set automatic syncing of the survey response data to the Salesforce accounts based on the parameters of your choice, like a contact number or email. You can choose among these options:
- Sync responses based on Salesforce Contact ID - Zonka Feedback will match the Contact ID and Salesforce account and all the relevant responses and survey details with the contact.
- Sync Responses based on Contact Email Address - You also have the choice to sync survey responses to the email addresses of your Salesforce contacts.
- Create a New Account in case the Email Address is not found and sync responses - If the email address of the respondent is not already in the Salesforce account, it will automatically create a new account.
Conclusion
Effective Integration of your CRM and survey software depends on effective mapping. You can make the best use of our survey platform Zonka Feedback's integration with Salesforce by ensuring effective customer mapping.
Also Read: Top Salesforce Survey Tools to know the best Salesforce Survey Tools for your business
